An Important Note For Windows and Linux Users
<CTRL-C>no longer copies, and instead it sends you back to Normal mode. The command that we use in Vim for copying is far less verbose:y(for yank).<CTRL-V>no longer pastes and instead sends you into Visual-block mode. Again, the command we use in Vim for pasting is less verbose: Just a singlep(for paste).<CTRL-F>no longer lets you search, and instead it allows you to scroll your screen one page forward. Once more, the command we use in Vim for searching is closer to your fingertips:/{term-i-am-searching-for}.
Use <ESC>, <CTRL-C> or <CTRL-[> to go back to Normal mode.
Moving Blazingly Fast With The Core Vim Motions
- Use
b(back) to jump to the beginning of a word backwards - Use
e(end) to jump to the end of a word - Use
geto jump to the end of a word backwards
Move To A Specific Character
Find character motions let you move horizontally quickly and with high precision:
Use f{character} (find) to move to the next occurrence of a character in a line. For instance, f" sends you to the next occurrence of a double quote.
If your target is behind the cursor you can use F{character} to find the previous occurrence of a character
- Use
t{character}to move the cursor just before the next occurrence of a character (think oft{character}of moving your cursor until that character). - Again, you can use
T{character}to do the same ast{character}but backwards
t is really useful when you combine motions with operators to perform text changes as you’ll soon discover (for instance, you could delete everything until ( and change it for something else).
You can see the ; and , as commands for repeating the last character search.
Move Horizontally Extremely
To move extremely horizontally use:
0: Moves to the first character of a line^: Moves to the first non-blank character of a line$: Moves to the end of a lineg_: Moves to the non-blank character at the end of a line
Moving Vertically
}jumps entire paragraphs downwards{similarly but upwardsCTRL-Dlets you move down half a page by scrolling the pageCTRL-Ulets you move up half a page also by scrolling
High Precision Vertical Motions With Search Pattern
Use
/{pattern}to search forward inside a fileUse
?{pattern}to search backwardsYou can think of
nas repeating a search.
Enabling Highlighted Search
For some reason unbeknownst to me, highlighted search isn’t enabled by default in VSCodeVim. To remedy that, go to Preferences and enable the Vim: Hlsearch option (or, alternatively, use vim.hlsearch in the json version of the configuration).
Type /<Enter> or ?<Enter> anytime to run the last search (forwards or backwards).
Or use \* to do a search for the word under the cursor (# to do the same backwards).
Moving Faster With Counts
2wallows us to move the cursor 2 words forward.5jchanges your cursor position to 5 lines below.3;lets you go to the next third occurrence of a character.2/babysends you flying to the second occurrence ofbabyin a document.
Relative Line Numbers
You can enable relative line numbers in your VSCode configuration by going to Preferences (Remember! Use the command palette with CMD-SHIFT-P or CTRL-SHIFT-P), searching for the line numbers configuration and setting it to relative.
Moving Semantically
- Use
gdto jump to definition of whatever is under your cursor. - Use
gfto jump to a file in an import.
And Some More Nifty Core Motions
- Type
ggto go to the top of the file. - Use
{line}ggto go to a specific line. - Use
Gto go to the end of the file. - Type
%jump to matching({[]}).
Summary
The concept of repeaters is a common theme in Vim and you’ll learn many of them throughout the book. Train yourself to rely on repeaters, and you’ll become the more effective for it.
Find character and search motions have repeaters (n, ;) that let us repeat the last search by typing just one character.
Editing Like Magic With Vim Operators
You can use operators and motions together by following any of these patterns:
{operator}{count}{motion}
{count}{operator}{motion}
For instance, the d2w combination allows you to delete two words almost.
d corresponds to the delete operator. Since d is an operator, you can follow the {operator}{count}{motion} formula and combine it with all the motions you’ve learned thus far:
- Use
d5jto delete 5 lines downwards - Type
df'to delete everything in the current line from the cursor until the first occurrence of the'character (including the character itself) - Or type
dt'to do like the above example but excluding the character (so up until or just before the'character) - Use
d/helloto delete everything until the first occurrence ofhello - Type
ggdGto delete a complete document
Useful Operators
g~ (switch case): Changes letters from lowercase to uppercase and back. Alternatively, use gu to make something lowercase and gU to make something uppercase
> (shift right): Adds indentation
< (shift left): Removes indentation
= (format code): Formats code
You can use these operators much like you used delete so that:
c/hellochanges everything until the first occurrence ofhello.ggyGcopies a whole documentgUwcapitalizes a word
Operator Shorthand Syntax
Double an operator to make it operate on a whole line: dd deletes a whole line, cc changes a whole line, etc.
Capitalize an operator to have it perform a stronger (or alternate) version of its default behavior: D deletes from the cursor to the end of the line, C changes to the end of a line, Y like yy copies a complete line, P pastes something before the cursor, etc.
Capitalize an operator to have it perform a stronger (or alternate) version of its default behavior:
D deletes from the cursor to the end of the line,
C changes to the end of a line,
Y like yy copies a complete line,
P pastes something before the cursor, etc.
Taking Editing Up a Notch With Text Objects
Words, sentences, quoted text, paragraphs, blocks, (HTML) tags, etc. These are text objects
the letter a (a text object plus whitespace) or i (inner object without whitespace) with a character that represents a text object itself:
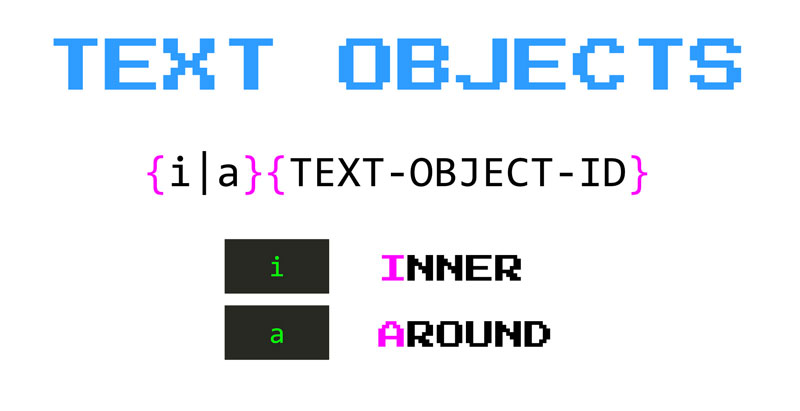
{operator}{a|i}{text-object}
wfor wordsfor sentence',", ``` for quotespfor paragraphb(or(,)) for block surrounded by(),B(or{,}) for block surrounded by{}<,>for a block surrounded by<>[,]for a block surrounded by[]tfor tag.
So in order to delete different bits of text you could any of the following commands:
dawto delete a word (plus trailing whitespace)ciwto change inner worddasto delete a sentence (disto delete inner sentence)da"to delete something in double quotes including the quotes themselves (di"deletes only the content inside the quotes and spares the quotes)ci"to change something inside double quotesdapto delete a paragraphdabda(orda)to delete a block surrounded by(daBda{orda}to delete a block surrounded by{datto delete an HTML tagcitto change the contents of an HTML tag
Repeating The Last Change with The Dot Operator
The . command allows you to repeat the last change you made.
Text-objects are more reliable than other motions because you don’t need to care as much where the cursor is positioned.
The . command works great in combination with the repeat search commands (;, ,, n or N). Imagine that you want to delete all occurrences of cucumber. A possible approach would be to search for cucumber /cucumber, delete it with daw and, from then on, use n to go to the next match and . to delete it! Two keystrokes!?! Again think of the possibilities!!
More Shorthand Text Editing Commands
Vim offers a series of shortcuts to operate on single characters that can be useful on occasion
xis equivalent todland deletes the character under the cursorXis equivalent todhand deletes the character before the cursorsis equivalent toch, deletes the character under the cursor and puts you into Insert mode~to switch case for a single character
As usual, all of the above support counts to operate on multiple characters at once.
Undoing and Redoing
- Type
uand you’ll undo your last change, - Type
CTRL-Rand you’ll redo it,
Summary
You apply an operator on a motion by using the key melody {operator}{motion}.
Some of the most useful and common operators are: d for delete, c for change, y for yank (copy) and p for put (paste).
When you double an operator you make it operate on a line.
when you capitalize a command it performs a stronger (or alternate) version of the original command.
For instance, you can use dd to delete a complete line.
For example, D deletes from the cursor to the end of a line.
You can multiply the effect of an operator motion combo by using a count like this: {operator}{count}{motion}.
Text objects are special motions that describe the parts of a document: words, sentences, paragraphs, and such.
using da" deletes a complete quote including trailing whitespace, using di" only deletes whatever is surrounded by quotes.
The dot command . lets you repeat the last change
Operations on text-objects are great candidates for the dot operator because they are more repeatable.
A great way to take advantage of the dot command is by using it in combination with searches. When you do that you can apply changes of successive searches with just two keystrokes: n or ; to find the next match and . to repeat the last change.
you can undo the last change with the u command. If you change your mind or undo too far, type CTRL-R to redo.
Chapter 8 Vim’s Secret Language
You can think of operators as verbs, counts as adjectives and motions as objects.
Chapter 9 - Inserting Text a la Vim
There’s two core commands that put you into Insert mode:
ifor insert and,afor append.
The i insert command puts you in insert mode before the cursor. While the a append command puts you in insert mode after the cursor (as if to append stuff wherever the cursor is placed).
Iputs you in Insert mode at the beginning of the current line whilst,Aputs you in Insert mode at the end.
oinserts a new line below the current one and drops you into Insert mode (mnemonic open a line below)Oinserts a new line above the current one and also drops you into Insert modegiputs you into Insert mode at the last place you made a change. This is great if you drop from Insert mode by mistake and want to go back where you were and continue typing. (This behavior is slightly different to Vim wheregisends you to the last place you left Insert mode).
CTRL-hlets you delete the last character you typedCTRL-wlets you delete the last word you typedCTRL-ulets you delete the last line you typed
Eventually, you’ll want to exit Insert mode and do other stuff. There are three ways to do this: <ESC>, CTRL-[ and CTRL-C.
Chap 10. Selecting Text in Visual Mode
vfor visual mode character-wise. This mode lets you select text character by characterVfor visual mode line-wise. This other one lets you select text line by line<C-V>for visual mode block-wise. This last mode lets you select text using rectangular blocks
In Normal mode you first define the operator and then a motion that represents some text to which to apply that operator:
{operator}{count}{motion}
In Visual mode, however, you select the text first and then you type the operator:
{trigger visual mode}{motion}{operator}
Visual mode is often slower than using commands directly in Normal mode but you’ll have that extra visual aid that gives you assurance that you’re applying a command exactly where you want it applied.
Chp 11 - Switfly Operating On Search Matches
It means that by taking advantage of gn we can operate on the next match using just one keystroke. With gn the . command encapsulates the meaning of “apply this change to the next match”.
In practice, if we were to follow the same example above using the gn command we would become much more efficient at terminating cucumbers:
- Search for cucumbers with
/cucumber - Apply change to next match
dgn - Repeat change to next match with
. - Just press
.until you’re done - Collect reward much faster
After using gn there’s no need to combine n and . because . already includes the next match. Awesome!
Chp 12 - Pushing the Boundaries of Copying and Pasting
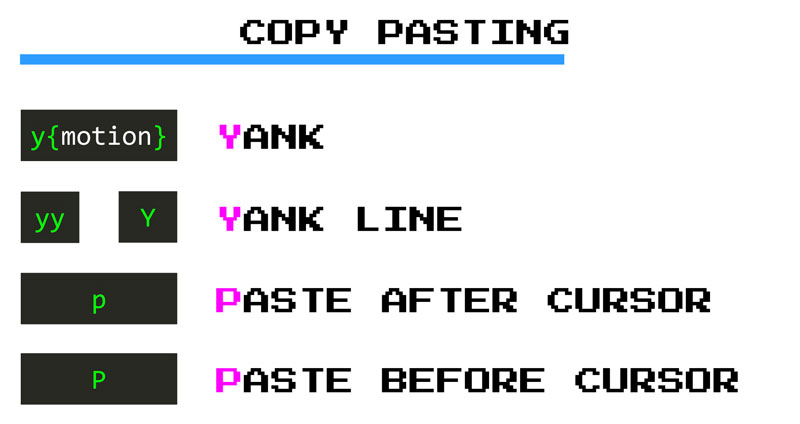
Yanking
ylyanks a letter,yawyanks a word,yasyanks a sentenceyi(yanks everything within(and so on…
If you double y as in yy you get a linewise operator like with dd and cc and yank a whole line. The Y command also yanks a complete line. I prefer to use yy but feel free to choose whichever you want.
Pasting
ppastes something after the cursorPpastes something before the cursorgpsame aspbut puts the cursor after the pasted selectiongPsame asPand puts the cursor after the pasted selection
Want to duplicate a line? It is as easy as typing yyp.
Want to n-plicate a line? It is as simple as typing yy{count}p.
Cutting Stuff In Vim
Want to swap some characters? Type dlp (or xp). Want to swap a couple of lines? Type ddp.
Multi-Copying and Cutting with Registers
The unnamed register " is where you copy and cut stuff to, when you don’t explicitly specify a register. The default register if you will.
The named registers a-z are registers you can use explicitly to copy and cut text at will
The yank register 0 stores the last thing you have yanked (copied)
The cut registers 1-9 store the last 9 things you cut by using either the delete or the change command
The named registers let you save bits of texts for later pasting. You can explicitly save on a register by using the following command:
"{name of register}y{motion}
"{name of register}d{motion}
"{name of register}c{motion}
For instance, "ayas yanks a sentence and stores it in register a. Now if you want to paste it somewhere else, you can type "ap. Alternatively, using the capitalized version a register (i.e. A instead of a) appends whatever you copy or cut into that register.
At any point in time, you can use the :reg command to see what is in your registers. Or you can type :reg {register} to inspect the contents of a specific register.
Pasting in Insert Mode
if you want to paste something when you’re in Insert mode?
Using CTRL-R {register} you can paste the contents of a register after the cursor:
CTRL-R "pastes the contents of the unnamed registerCTRL-R apastes the contents of registeraCTRL-R 0pastes the contents of the yank register
Chp 13 - Control VSCode With Command-line Mode
:colorscheme
:edit
(:!)
:delete
VSCodeVim has support for only a very limited number of Ex commands but they can be greatly enhanced by integrating VSCodeVim with Neovim.
Typing an Ex Command
:edit {relative-path-to-file}
:edit and Relative Paths
When using the :edit command, VSCodeVim is configured to use relative paths in relation to the currently opened file. It doesn’t support TAB completion so it’s mostly useful to create new files that co-located or live near the current file you’re working on.
For instance, the shorthand version of :edit is :e.
Saving and Closing Files
Use
:write(shorthand:w) to save a fileUse
:quit(shorthand:q) to close a fileUse
:wall(shorthand:wa) to save all filesUse
:qall(shorthand:qa) to close all filesUse
:wqall(shorthand:wqa) to save and close all filesUse
:qall!(shorthand:qa!) to close all files without saving
Deleting Multiple Lines At Once
:[range]command[options]
Where range defines a range of lines to which to apply the command and options vary depending on the command itself. For instance, in the case of :delete we have:
:[range]d [register]
:10,12d a
Repeating Ex Commands
Just like you can repeat Normal mode commands with the dot operator, Ex commands also have a repeater command. Type @: and you will repeat the last ex command, from then on you can repeat it again with @@.
Substituting Text
Another useful Ex command is :substitute
:[range]s/{pattern}/{substitute}/{flags}
Where:
rangedefines the range in which we’ll apply the substitutionpatternis a search pattern that describes the text we want to change. Like/{pattern}it supports regular expressions.substituteis the text we want to substituteflagslet us set options that configure the substitution
For example, the following command:
:s/led/gold
If we want to change all occurrences in the current line then we need to add the g flag or global flag like so:
:s/led/gold/g
And if we want to change all occurrences for a whole file we just need to specify the entire file as a range with % like this:
:%s/led/gold/g
In addition to the g flag we can use:
ifor case insensitive searchescto confirm each and every substitution
The fact that we can use regular expressions with the :s command opens the door to a lot of creative use cases. For instance, we could change the indentation level of all titles in a markdown file by using the following :s command:
:%s/^#//
Which can be translated to:
%for the whole filessubstitute^#any#at the beginning of a line (i.e. a header in markdown)//for an empty character
Chp 14 - Splits, Tabs and Switching Between Them
- Use the
:sp {relative-path-to-file}command to open a file in a horizontal split. - Use the
:vsp {relative-path-to-file}command to open a file in a vertical split.
Alternatively, instead of these Ex commands you can use:
<CTRL-W> Sto open horizontal split (mnemonic Window and Split).<CTRL-W> Vto open a vertical split (mnemonic Vertical).
Tabs
Use :tabnew {file} to open a file in a new tab
Use :tabn (:tabnext) to go to the next tab
Use :tabp (:tabprevious) to go to the previous tab
Use :tabo (:tabonly) to close all other tabs
- Vim works with tabs of splits, whereas VSCode works with splits of tabs. I find the former much better to work with than the latter. Within Vim a tab can denote a feature or workspace, whereas splits within a tab correspond to a related piece of functionality. In my opinion, this is a much better mental model and way of working.↩
Chp 15 - Surrounding Things With Vim Surround
dsto delete the surroundingscsto change the surroundingsysto add surroundingsds{count}{motion} cs{count}{motion} ys{count}{motion}
ds' to delete the surrounding ' (ds{char})
cs'" to change the surrounding ' for " (cs{old}{new})
ysaptli> to surround a paragraph with an <li> tag (ys{motion}{char})
Want to surround several pieces of text with a <li> element? You can type ysaptli> the first time and then . the subsequent ones.
You can also use vim-surround by selecting a bit of text in visual mode and then using S{desired character}. This will surround your text selection with the desired character.
Chp 16 - Elevating Your Workflow With Custom Mappings
Creating Custom Mappings
You can create custom mappings using Visual Studio Code preferences:
- Open the command palette with
CMD-SHIFT-PorCTRL-SHIFT-P - Type preferences
- Select the Preferences: Open User Settings Options
- Type
vim
Some Good Custom Mappings
Moving Up and Down Faster in Normal Mode
These mappings allow you to move up and down faster in Normal mode (although they are just as useful in Visual mode):
{
  "vim.normalModeKeyBindingsNonRecursive": [
    {
      "before": ["J"],
      "after": ["5", "j"]
    },
    {
      "before": ["K"],
      "after": ["5", "k"]
    },
  ]
}
From now on you’ll be able to use:
Jto move down fasterKto move up faster
Keep Joining Lines
{
  "vim.normalModeKeyBindingsNonRecursive": [
    {
      "before": ["<Leader>", "j"],
      "after": ["J"]
    },
  ]
}
So now whenever you type <Leader>j, Vim will translate it to J and join two lines together. Try it out!
Easier Switching Between Splits
Switching split windows is something that you’ll do all the time so try out these bindings:
{
  "vim.normalModeKeyBindingsNonRecursive": [
    {
      "before": ["<C-h>"],
      "after": ["<C-w>", "h"]
    },
    {
      "before": ["<C-j>"],
      "after": ["<C-w>", "j"]
    },
    {
      "before": ["<C-k>"],
      "after": ["<C-w>", "k"]
    },
    {
      "before": ["<C-l>"],
      "after": ["<C-w>", "l"]
    }]
}
Easier Tab Handling
{
  "vim.normalModeKeyBindingsNonRecursive": [
    {
      "before": ["<Leader>", "t", "t"],
      "commands": [":tabnew"]
    },
    {
      "before": ["<Leader>", "t", "n"],
      "commands": [":tabnext"]
    },
    {
      "before": ["<Leader>", "t", "p"],
      "commands": [":tabprev"]
    },
    {
      "before": ["<Leader>", "t", "o"],
      "commands": [":tabo"]
    }]
}
Did you notice something different about these custom mappings?
Exactly! You use a slightly different syntax when mapping keys to commands. Instead of using before and after. We use before and commands. commands represent either the Ex commands or Visual Studio native commands that should be run whenever we type the key mapping defined by before.
Cleaning Highlighted Text
When you search for patterns in Vim using the /{pattern} and ?{pattern} commands, the matching patterns will be highlighted. In order to remove the highlights you can use the :noh (no higlighting) command.
{
  "vim.normalModeKeyBindingsNonRecursive": [
    {
      "before": ["<Leader>", "/"],
      "commands": [":noh"]
    }]
}
Creating Custom Mappings To VSCode Actions
Yet another cool thing that you can do with VSCode is to use Vim mappings that trigger Visual Studio Code native commands. For instance, the following binding:
{
  "vim.normalModeKeyBindingsNonRecursive": [
    {
      "before": ["leader", "w"],
      "commands": [
          "workbench.action.files.save",
      ]
    }
}
Let’s you save a file using <leader>w by triggering VSCode "workbench.action.files.save" action.
Let’s look at another example. There’s four features in VSCode that I find extremely useful:
- The Command Palette (
CTRL-SHIFT-PorCMD-SHIFT-P) - Go To File (
CTRL-PorCMD-P) - Go To Symbol in File (
CTRL-SHIFT-OorCMD-SHIFT-O) - Go To Symbol in Workspace (
CMD-TorCTRL-T)
The command palette and go to symbol in file are particularly hard to type so let’s create a custom mapping to keep our wrists healthy:
{
  "vim.normalModeKeyBindingsNonRecursive": [
    {
      "before": ["<Leader>", "p"],
      "commands": [
          "workbench.action.showCommands",
      ]
    },
    {
      "before": ["<Leader>", "t"],
      "commands": [
          "workbench.action.gotoSymbol",
      ]
    }
  ]
}
Now you no longer need to contort your fingers to open the command palette or go to symbol. Just type <Leader>p and <Leader>t respectively and you’ll quickly access either of these panels. Yihoo!
Chp 17 - Moving Even Faster with Vim Surround and EasyMotion
Both of these plugins need to be enabled via your VSCodeVim settings. To enable them, just go to Preferences, Settings search for vim sneak or vim easymotion and you’ll find the switch.
Vim-sneak
Vim-sneak is a middle ground between character search (inside a line) and pattern search (inside a file):
- Type
s{char}{char}and the cursor flies to the first occurrence of that two character sequence. - From then on type
;for the next occurrence, or,for the previous one. S{char}{char}works in a similar fashion but backwards.
Where vim-surround extended Vim’s secret language with an operator, vim-sneak does the same but with a motion: the sneak motion. As such, you can use it in combination with other operators:
- Type
{operator}z{char}{char}and the operator will be applied over the text traversed by the sneak motion.
Why z Instead of s?
When used in conjunction with other operators, vim-sneak uses the z because the s is already taken by vim-surround. And vim-surround is an extremely popular Vim plugin.
Vim-EasyMotion
For instance, type <leader><leader>w and EasyMotion will label the beginning of all words ahead of you like so:
EasyMotion Only Works for Moving Around
In the VSCodeVim version, the motions in EasyMotion only support moving around and can’t be combined with operators. This is a feature that is supported in traditional Vim so it may be something that will come to VSCodeVim down the line.
Chp 18 - Multiple Cursors
Add Multiple Cursors Based of Word Search
If you want to add multiple cursors based on word search you need to:
- Move the cursor on top of a word in your code.
- Type
<CMD-D>(CTRL-Don Windows/Linux) orgbto add another cursor. This puts Vim into Visual mode and ready to operate on the word you have selected. - Type
<CMD-D>(CTRL-Don Windows/Linux) orgbto continue adding cursors until you’re done. - Now you can perform an action in Visual mode (delete, change, etc) or,
- Go back to Normal mode with
<ESC>and type any Normal mode command keeping the multiple cursors.
Reusable Editing With Macros
Vim loves saving you time and hassle, and offers you lots of ways in which you can repeat commands:
- The
.command lets you repeat the last change. - The
;and,commands let you repeat the last character search forwards and backwards respectively. nandNlet you repeat the last search also forwards and backwards./and?also let you repeat the last search forwards or backwards.:@and@@let you repeat Ex commands.
Vim macros take this power of repetition to the next level by allowing you to record a collection of commands as you type them, and then replay them at will. As such, macros become reusable editing actions that can save you a lot of time.
Chp 20 - Enhanced File Explorer, Panes and Palettes
You can take advantage of your newly learned Vim bindings to interact with the VSCode’s File explorer. Jump inside the File explorer via the command palette, or by simply moving from the code window via <CTRL-W> h and you’ll be able to:
- Traverse file explorer up and down with
kandj. - Expand directories with
l(right) when the cursor is over a directory. - Collapse directories with
h(left). - Open files with
l(right) when the cursor is on a file.
This is nice if you’re new to a project and want to have an idea about how the project is structured. Otherwise, always prefer using Visual Studio’s Go To functionality. Remember:
- Go To File with
CMD-Pin Mac (orCTRL-Pin Windows/Linux) - Go To Symbol in File with
CMD-SHIFT-Oin Mac (orCTRL-SHIFT-Oin Windows/Linux) - Go To Symbol in Workspace with with
CMD-Tin Mac (orCTRL-Tin Windows/Linux)
Likewise you can use k and j with panes and palettes. Whenever you open a command palette or the Go To panes, you can:
- Type
TABwhich will take you to the selection area and, - From there you can use
kandjto go up and down to the item you desire. - Press
Enterand you’ll either open a file or perform a command palette action.
Chp 21 - Integrating VSCode With Neovim
Chp 22 - Some Handy VSCode only key mappings
These are some handy mappings the VSCodeVim team came up with. They are inspired by Vim and work only in Visual Studio code:
afis a Visual mode command that selects increasingly larger blocks of text.ghis the equivalent of hovering the mouse over where the cursor is. Super handy in order to enable a keyboard only workflow and still enjoy some features (error messages, types, etc) only available via the mouse.